Showing posts with label Fabric. Show all posts

Monday, October 11, 2010

Handkerchief Skirt

I was at Dollar Tree two weeks ago and spotted these darling handkerchiefs that were only 2/$1. Loved the price and colors so I picked up a few packs knowing I could could think up something cute to use them for.

So I made a cute little skirt for my daughter and she loves it! It's perfect for everyday, church, or play.


This skirt cost me only $1.00 to make! Love that! This a very easy project that anyone can make.

Here's how to do it!

Handkerchief Skirt
Best for sizes 3T and smaller

Supplies:
1 Handkerchief
1/4-1/2 wide elastic - enough to go around the waist
Sewing machine, thread, pins, scissors

Assembly:
1. Cut your handkerchief in half.

2. Put right sides together and sew the two side seams.

3. Fold the top edge down about 1 inch (depending on your elastic width) and pin. This will be your casing to put the elastic through.  Mark off a spot by crossing 2 pins to leave an opening for the elastic.


4. Sew right on top of the raw edge with a zigzag stitch. This will keep the fabric from fraying in the wash. If you'd like you could fold under the raw edge and then ssw (just be sure the casing is wide enough for your elastic).

5. Measure the elastic around the waist of your subject so it is fits, but is not snug. Cut. Then place a safety pin on one end.

6. Now push the safety end through the opening in the casing you sewed.

7. Once the elastic is through push all the fabric to one side so you can grab both ends of the elastic. Overlap the elastic 1 - 1.5 inches so it will now be snug around the wearers waist.

8. Sew the elastic ends together several times.

9. Push the elastic all the way into the casing. Pull the fabric flat and sew the opening closed being sure to backstich to secure the ends. I forgot a picture - sorry!

Now you're done!

The Finished Project:


So simple and cute for only a $1! 

Tuesday, September 28, 2010

Trick-or-Treat Bag Tutorial

Oh, I'm so excited to share with you the trick-or-treat bag I made! It's cute, simple, fun, and incredibly more easy to store than those plastic pumpkin buckets. I fell in love with all the Halloween fabric out there (which is sure to be on sale) so I decided to make a two-toned bag and I love how it turned out.

So here is how you can make one for your kids, grand kids, nieces, nephews and friends!

Trick-or-Treat Bag Tutorial
What you need (in addition to sewing machine, thread, pins etc. . .):
Fabric - 1/2 yard of 2 different fabrics (this is actually more than you need for the size of bag I made, but you might decide to make you bag larger or have other projects you could use the scraps for. Exact dimensions are below.)
Ribbon - gross grain - 1 spool (I used 2- 17 inch pieces for the handle) I also used lots of scrap ribbon to make the little ribbon puff attached to the bag.


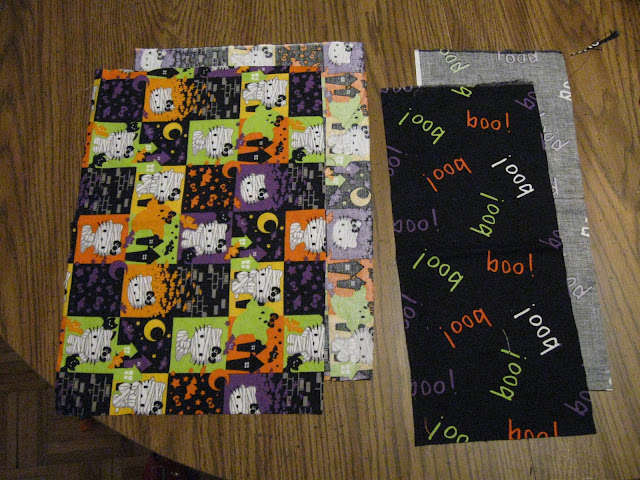
#1 Cut out the pieces of the bag, 2 of each fabric - kitty fabric - 9.5 X 14 inches, Boo fabric - 6.5 X14 


#2 Line up and pin right sides together - one of each fabric making sure that if your fabric has a picture that it is going in the right direction. You will have two sets.


#3 Sew the pinned edge with about a 1/4 inch seam. I did double seams for added strength. Do this with both sets.

#4 - Fold the top edge of the bag in a 1/2 inch and then fold another 1/2 inch and pin down. This will be the top seam of your bag. 

#5 Lay both sets (sides of bag) on top of each other - right sides together. Now line up your seams - the seams of the connecting fabrics should be lined up first and then check to see that the top of the bag is matching and adjust accordingly. Pin bag in place around the bottom and both sides.

#6 Now sew around the bag on the two sides and bottom. Be sure to secure your threads by back stitching at the ends. I did double seams for added strength.

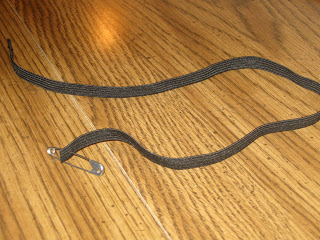
#7 Cut two 17 inch strips of ribbon. You will need to heat seal the ends by quickly brushing a flame (lighter or candle) across the end. Seems scary, but it just barely melts the end to keep it from fraying. See the difference in the picture.

#8 Line up your ribbon 4 inches from the outside edge of the bag with the right side of the ribbon facing in. Pin in place.

#9 Open the bag and slip it around the arm of the sewing machine. Sew on the seam close to the bottom edge of the fold and then another seam near the top edge of the bag. I backstiched a few times over the ribbon for added strength.


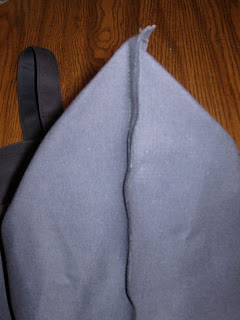
#10  To square off the bag on the bottom grab both side of the bag and pull out. Grab the bottom corner (which is now a triangle shape) and feel with your hands to line up the seams. Measure 2 inches from the corner and pin. (Need help with this step - see it in more detail on another bag I made HERE.) Sew a seam securing the ends. You can cut the extra fabric off if desired.


#11 Turn the bag right side out and you are done!!


Optional String Puff - I just cut small ribbon pieces, tied them together and then used one string to tie them to the handle of the bag. I like how it dresses up the bag a bit and gives it more character.


I hope you have fun make some washable, durable and easy to store bags for Halloween!


Tuesday, August 31, 2010

Placemat Tote Tutorial

Here is an extremely easy Placemat Tote Bag Tutorial for you. This is such a cute, cheap, simple and frugal way to make a new bag to take with you to the kids soccer games, the park, or to church. The possibilities for colors and fabrics are endless.

Here's what you need:

- 2 Placemats
- 1 spool of ribbon
- Thread
- A few pins
- Sewing Machine

That's it. I got all my supplies at Walmart. The placemats where s $1 each and the ribbon $2.97 - only $5.00 for a new fun homemade bag!


Here's what you do:


1. Cut off a few inches ( I took off 3) from the length of your placemats.


2. Fold under 1/4 inch than another 1/4-1/2 inch so all those frayed ends are tucked inside. Then sew to hem and secure. This will be the top edge of your bag. (Make sure your thread matches your bag here.)


3. Cut your spool of ribbon in half. Lay the ribbon out from the bottom of the placemat up and around to make the handle for each mat. To ensure your ribbons are going to match up measure 3-3.5 inches from the outer edge on both sides. Pin the ribbon in place.

Once pinned lay the two placemats with right sides together and check to make sure that the ribbons line up correctly at the bottom, so once you  complete the project everything will be lined up and matching.


4.  Carefully sew the ribbon on to each placemat sewing very close to the edge on each side of the ribbon.

5. Put the placemats right sides together. Line up the bottom ribbons and pin the two sides and bottom. Sew the edges together  about 1/4 inch from the edge.


6. To square off the bottom you need to pull the sides of the bag away from each other. Then you will grab one corner and squish the bottom and side seams together until they line up. Just feel with your hand to make sure the seams line up and pin in place. (I hope that explains it well enough:) I used pics from another bag I made because they were easier to see. Let me know if you have questions.)


7.  Sew about 2 inches in from the "triangle tip". Repeat on the other side.


8. Turn your bag inside out and admire your work!! 


For the blue bag I didn't cut the placemats at all. 
I simply made a few folds and then attached the ribbon on the inside to give it a different look.
**I've been using this tote as a diaper bag lately. It's holding up great and I love it!**


Sunday, August 1, 2010

Ironing Board Cover


This past year I have done more ironing than ever before. After wearing scrubs to school for 4 years my husband now has to wear a shirt and a tie to school/work everyday and on Sundays for church. I really don't mind ironing too much, but it certainly can be time consuming.

I decided that if I have to stand over the ironing board for an hour or more each week that it ought to be pretty. So I bought some fabric and transformed my stained and very outdated ironing board cover to something pretty. I made sure to get a dark and patterned fabric so future stains would be more disguised.

The nice thing about making your own is that you can customize it to your laundry room, house, and have something more fun and original than the covers from the store.

Grab your JoAnn's coupon and head to the store for some fabric and elastic to make a new ironing board cover for yourself. My whole project only cost $5!

What You'll Need:
Fabric - Everyone's ironing board is a little different in size. Take off your current cover and measure it or take it with you to the fabric store to know how much to get. I just used a simple calico cotton.

Elastic -  Cording or 1/4inch elastic - 1 package should be enough. Mine was 2.5 yards and I didn't use it all.

Pins
Safety Pin
Scissors
Thread
Sewing Machine


Step 1: Layout your fabric (pre-shrunk) and lay your old cover on top. Put a few pins in it to keep it in place. (I really wanted this fabric because it was so cheap and the end of the bolt. There wasn't quite enough for me to cut it out straight. There is no need to cut your fabric on a diagonal like I did!)

Step 2: Measure and mark 1-1.5 inches (depending on your elastic width) all the way around your old cover. This extra fabric will become the casing for your elastic.

Step 3:  Cut the fabric on the marks you made.

Step 4: Fold the edge of the fabric in 1/2 inch (or half of the measurement you used in step 2). Pin in place.

Be sure to mark one area about 3 inches where you will not sew it closed. I marked my area with 2 crossed pins.

Step 5: Sew the hem down about 1/8 inch from the edge. I used a straight stitch, but would have used a zigzag very close to the raw edge if my sewing machine would have been working correctly. Don't sew it completely shut - you need that 3 inch space to put the elastic through!


Step 6: Pin down one end of your elastic ends at the opening.

Step 7: Put a safety pin through the free end of the elastic. Push the pin and elastic through the opening and all around the edge of your cover.

Step 8: Once the two elastic ends meet, pin them together and try the cover on your ironing board. This will be the time that you decide how tight to make your elastic. You will want to make it very snug as you don't want any bunching while you are ironing your clothes.
Once you have decided how tight to make the elastic tie it in a knot or sew the ends securely together.

Step 9: Tuck the elastic back in the edge and sew the hole closed.

Step 10: Put your finished cover on your ironing board and you are done!! I left my old pad and cover underneath for a little extra cushion. Don't use your old cover if it has an rips or tears in it.

Now you have a beautiful board to do your ironing on. It definitely makes me happy to be staring at this instead of the old one I had on before! 


I am no expert seamstress (as I'm sure you can tell), but this project is rather forgiving since your seams are all hidden underneath. Please ask questions if you have any! Have fun!

LinkWithin

Related Posts with Thumbnails