Showing posts with label Christmas. Show all posts

Thursday, December 29, 2011

Our FREE Christmas!

Free . . . we bought presents for all 5 of our kids and didn't spend any money, none! Here's a peek into how we did it and to give you encouragement in planning for the next Christmas season so you can also have a free Christmas!

1. Set a limit on gifts. We only buy each child three presents. Well, Santa brings one and we buy them two. Keep the gift giving simple my friends. We have always kept Christmas small and intend to as the years go on. There is absolutely no need or reason to spend loads of money on Christmas presents or to have the gifts spewing out from under the tree. Set a limit and stick to it. It's best to do this when your kids are very young and they won't know any different as they grow up and it will obviously save you money.


Not a lot of gifts, right? No one seems too sad about that do they! They all loved their gifts and no one asked for anything more.

2. Plan ahead. Six months ago a friend gave me a bag of very cute dress up clothes. There was about 6-8 outfits in the bag and they were all in great condition.  The minute she brought them to my door I hid them away without any of the kids seeing them knowing that I wanted to use them as Christmas gifts. Tessa (4) and Claire (2) were thrilled with them!! We were also given a pocket knife a few weeks ago and saved that as a gift too.

If you get a nice hand-me-down or find a super cheap deal on some toys (have you seen the after Christmas sales?!) hide it away for Christmas, even if it is for several months or even a year. You will save big time!!

3. Use Swagbucks! Free gift cards for just searching the internet, you just can't beat that kind of a deal. That's FREE money people. I always use my swagbucks for Amazon gift cards as it is the best deal. Don't worry, you can get free shipping quite often on Amazon too.

We used some swagbucks to buy two gifts for Christmas this year. If you saved up your Swagbucks you could pay for your whole Christmas this way. To learn more about Swagbucks and to sign up (it's free) go HERE.

Search & Win

4. Use your credit card rewards. We had $100 in Visa gift cards from our credit card rewards. Again, FREE money for charging and paying off our credit card on time. We used this free money to buys gifts at TJMaxx and Wal-mart. FREE!

(Please note - We NEVER charge anything on our credit card unless we have the money to pay it off right away. I suggest you do the same. We might have a crazy amount of student loans, but have NEVER EVER had consumer debt or paid any interest on a credit card. Only use credit cards if you have the cash to pay it. End of story!)

Want to know some of the things we bought? Basketball shoes, transformers, walkie talkies, candy, purse pets, necklace, scrapbook pack, books, dress up shoes, second hand clothes etc . . . 

So there you have it . . . we spent about $120 -ish on gifts for our children for Christmas, but didn't pay a single penny for any of it. That's how we had a FREE Christmas! You can do it too!!


P.S. My husband and I don't really exchange gifts. With always having been students and now just starting our own business we are putting our money towards that. The only present under the tree for us this year was a homemade gift from our daughter and we love it that way!

Do you have a massive amount of toys in your house? Stay tuned for our 10 Toy Rule!! You'll think we are crazy, but you'll love it!!

Sunday, December 25, 2011

Tuesday, December 20, 2011

Candy Cane Reindeer

This little craft brings back so many memories of Christmas as a kid. I used to love making these little guys with my mom and decided it was time to introduce them to my own kids. They loved them and had so much fun picking out different eyeball combinations!!

This is such a quick and easy craft to do with your kids. Just be sure you are the one doing the hot glueing :)

All you need are a few simple things:
* Candy canes
* Brown pipe cleaners (found at walmart)
* Google Eyes
* Red nose (candy, holly berry, etc . . .)
* Hot Glue gun

Cut pipe cleaners in sections - about 4-5 inches for main antlers and about 1-2 inches for smaller forks of the antlers.

Twist the large pipe cleaner around the candy cane to secure and them bend ends up. Take a small piece and wrap it around the larger section to make the forks of the antlers.

Glue on the eyes and nose and you've got a cute little reindeer to share with friends, hang on your tree etc. . . . Have fun!!


Thursday, December 15, 2011

Decorate with Green & Blue

When my husband told me that they painted the walls of his new office blue, green and gray I wasn't quite sure what to think. Now all I can think is about how much I LOVE them! They are bright, fun, and unique.

With the office being brand new Cole (my husband) wanted to keep the office Christmas decorations within the same blue and green office theme. Shopping around I found that it was going to be a lot easier than I thought to decorate with those colors.

Take a look.


A new office means a small budget so I kept things simple this year. I think it turned out classy and beautiful.

Here's what I did:

*Hung glittery snowflakes in the windows and from the decorative beams in the waiting room. They were hung with clear fishing line.

* Filled tall glass cylinders (I'm sure they have another name) with varying colors and size ornaments. Cylinders were purchased at TJMax and Ross.

* Filled sugar jars with candy canes the color of his office and decorated with a ribbon and little glittery sprigs (found at JoAnn).

* Decorated small white trees with ornaments and small glittery sprigs.

Next year I hope to add a large tree and some white wreaths!!

Check out our website at www.LiveGrowSmile.com!! You can also find Cole's own blog HERE.

Tuesday, December 6, 2011

Nativity Wall Hanging

A few years ago I spotted those glass block with the vinyl nativity on them and fell in love. It was the simplicity of the black silhouette that caught my eye, so elegant in portraying the miraculous birth of our Savior.

I immediately bought 2 sets from Say It On The Wall knowing I wanted one for myself and that the other would be gifted to my mom.

We lived in a tiny apartment at the time and I really didn't have anywhere to put glass blocks so I decided to take a different approach. I framed and hang them on the wall instead. I was very happy with the end result and still am years later.

Here's what I did (with no pictures since it was made several years ago).

* Cut nice white card stock and stuck the vinyl to it.
* Put them in nice, but inexpensive black frames.
* Used large red ribbon in long strip across the back, attaching with large staples (or small nails) and hot glue.
* Made and attached a nice big bow at the to.
* I hung it on the wall with a few small nails making sure they were hidden behind the bow.

Simple, Elegant and all about the true meaning of Christmas . . . Christ.

(Please excuse the fact that the frames are looking a bit beat up. We moved across the country twice since I've made these and obviously I didn't wrap them well enough. Maybe next year they will get a makeover.)


Vinyl can be purchased at Say it on the Wall.

Monday, December 5, 2011

Reindeer

Another fabulous thrift store find for me was these two paper mache reindeer. I instantly loved them but knew they needed a little work to fit in my silver and red theme I have going on.

Here they are in the garage getting ready to be spray painted. Not too bad . . . just not what I wanted.

After a few coats of paint, a red ribbon and some holly from my yard and I now have two reindeer that I love!


You're probably thinking that there is no way you are going to find these darling reindeer in your thrift store. You might be right, but take a chance and go look and see what you can find . . . maybe you'll find some awesome snowman, santa, sleigh etc. . .  that could use a little make-over.

If you really want some reindeer I've hear that some craft stores sell items like this or I did find some online that look almost identical  . . . go HERE.

Happy thrifting everyone!

** To see both reindeer and my finished mantle click HERE**

Friday, December 2, 2011

Holly Wreath

I am more than thrilled with my thrift store wreath make-over!

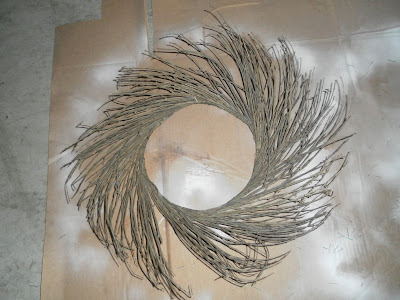
My trip to the Goodwill recently was a hit. I was in need of a something to put on my mantle and I saw this plain twig wreath and thought I could make-it over and make it pretty. I LOVE the way it turned out and it was so cheap!!


Total spent on this project: $5.00!
Wreath: 2.99 @ Goodwill
Star: 1.00 @ Dollar Tree
Holly: Free - my own back yard (check your local christmas tree farms)
Mirror: Free - hand-me-down from my mom
Spray Paint: 1.00 (for the amount I used)


So hit up your thrift store, dollar store, yard and own garage to see what you have to make-over a wreath of your own! It's really fun and quite simple, plus you'll probably love it so much that you'll just sit and gaze at it with a smile on your face (at least I do).

1: Spray paint the wreath - I chose silver.

2. Cut holly from bush (or use greenery/berry sprigs from craft store).

3. Attach to wreath using wire or hot glue. I used wire since my holly is real and I wanted to be able to remove it after the holidays before I put the wreath in storage.


4. Paint the frame of mirror. My frame was gold, but I wanted white. After few coats of spray paint  I wasn't getting a solid color (probably because I didn't sand it before . . . oops). However I really like how the pain kind of crackled!

4. Attach the wreath to the mirror/frame. I used fishing string so it would be invisible. I looped it through the wreath and then glued it to the back of the frame. The wreath was tipping forward so I put a small dab of hot glue at on the mirror and stuck it to it. Worked like a charm.


 Loving the completed project!!


Reindeer make-over - Tomorrow!

I linked to Home Stories A to Z.
Tip Junkie handmade projects

LinkWithin

Related Posts with Thumbnails